IP 기반 Home IOT 통신 표준
이전에는 Project CHIP라고 불렸으며, 매터(Matter)로 변경됨.
: https://github.com/project-chip/connectedhomeip
아래 architecture 는 layer 간 역할과 기능을 적절하게 분리하여 서비스를 제공한다.
-
Application
장치의 High-order business logic. 예) 조명 기능을 갖춘 애플리케이션에는 조명 켜기/끄기와 같은 기능을 처리함. -
Data model
Application layer에서 사용되는 data 및 기능. Application layer의 기능에 필요한 데이터 모델을 관리. -
Interaction model
Interaction model layer에서는 client와 server 장치간에 수행할 수 있는 상호 동작 기능을 정의한다.
예를 들어, 서버 장치에서 속성을 read/write하는 것에 대한 동작을 수행한다. 이러한 상호 동작 기능에 필요한 데이터는 Data model layer에서 정의된 요소에서 동작한다. -
Action framing
Interaction mode을 사용하여 동작이 구성되면 네트워크 전송을 위해 인코딩하기 위해 규적된 압축 바이너리 형식으로 직렬화 한다. -
Security
Action framing 에서 인코딩된 frame을 전달받아 security layer에서 데이터 payload를 암호화 하고, singging하여 패킷의 발신자와 수신자 모두가 데이터를 보호하고 인증하도록 한다. -
Message Framing & Routing
암호화 및 singging된 페이로드의 헤더 필드를 정의한다. 메시지의 속성과 라우팅 정보를 지정한다. -
IP Framing & Transport Management
최종 payload 가 구성된 후, 데이터를 전송한다.
Connected Home Over IP 는 Google, Amazon, Apple, Zigbee Alliance 등이 함께 개발한 IoT 기기 간의 상호 운용성을 향상시키기 위한 개방형 표준.
이 표준은 Wi-Fi, Thread, Bluetooth LE 등 다양한 프로토콜을 지원하며, 사용자는 다양한 제조사의 IoT기기를 하나의 허브에서 관리 가능.
project-chip repositories 에 대해 정리.
15 repositories로 구성되어 있음(2024/05/29)
- connectedhomeip
- connectedhomeip-doc
project-chip/connectedhomeip의 doxygen format doc - certification-tool
Matter 의 원칙은 Local Control
-
Matter Hub
Matter Hub는 컨트롤러가 연결되고 통합하는 중앙 장치.
허브는 네트워크의 다양한 장치를 관리하는데 도움 된다.
이를 통한 한 위치의 단일 액세스 포인트에 연결된 장치를 제어할 수 있다.
하나의 단일 플랫폼에서 다양한 Matter 스마트 홈 장치를 추가,제어 및 관리하려면 Matter Hub가 필요하다.- Amazon Echo/Alexa devices
- Google Home/Nest Hub products
- Apple HomePod

-
Matter Bridge
Matter Bridge 는 Matter 가 아닌 제품을 Matter 생태계로 가져올 수 있는 장치이다.
장치 사이의 중개자 역할이며, 예를들어 오래된 Zigbee 플러그가 있는 경우, Matter Bridge를 통해
Matter 네트워크에 연결할 수 있다. Bridge는 호환성을 허용하는 두 프로토콜 간을 변환하는 역할을 한다.Bridge는 기존 스마트홈 기술을 새로운 Matter 장치와 통합하는데 도움이 된다.
이들은 Legacy 제품을 새로운 표준으로 끌어올린다.
Zigbee, Z Wave, Bluetooth 장치를 Matter가 아닌 장치를 Matter 지원 장치로 사용할 수 있다.
-
Matter Hub 와 Matter Bridge 간 차이점
Hub는 Matter 네트워크의 주요 액세스 포인트 이고, Bridge 는 다른 프로토콜에 연결된다.
Hub는 원격 제어 및 자동화를 가능하게 하고, Bridge는 translation 과 compatibility에 중점을 둔다.
Matter 설정에는 하나의 Hub만 필요하지만 translation에는 여러개의 Bridge가 있을 수 있다.
요약하면 Hub는 중앙컨트롤러이고, Bridge는 다른 표준에 대한 translation 역할을 한다. -
homeBridge
HomeBridge는 Ring 및 Nest 와 같은 브랜드의 HomeKit 세서리를 지원하기 위해 HomeKit을 모조하는 무료 오픈 소스 소프트웨어이다. PC, Mac과 같이 항상 켜져 있는 장치에서 서버 소프트웨어와 추가하려는 액세서리의 종류에 대한 플러그인을 설치해야 한다.
site : https://homebridge.io/
study : https://github.com/Orachigami/homebridge-android- Matter 와 HomeBridge관 관계 Matter를 지원하는 장치는 스마트 홈에 연결하기 위해 HomeBridge를 통할 필요가 없다. 현재 Matter 표준은 제한된 장치 유형(조명, 도어장금장치, 센서, 스피커 등)만 지원하고 있기때문에, HomeBridge를 통해 제한적인 장치를 Matter 플랫폼에 지원 할 수 있도록 할수 있다.
-
Third party border router
thrid-party border router 를 사용하면 기존 thread 인터페이스를 제공하지 않는 Hub에서 thread 인터페이스로 연결되는 Matter 장치를 연결할수 있다.
thread Boarder 라우터는 thread network를 local IP network, WiFi or Ethernet 에 연결하기 위해 Matter protocol을 사용하여 thread 장치와 Controller간의 연결을 위한 Access porint 역할을 한다. -
Matter Cluster Matter Cluster는 Matter 애플리케이션의 데이터 모델에서 사용되는 기본 요소.
(인터페이스, 서비스, 객체 클래스가 될수 잇으며, 데이터 모델에서 가장 낮은 독립적인 기능적 요소)
Cluster는 Matter 장치 내에서 단일 기능을 나타냄.
e.g. 장치를 켜고 끄는 기능과 같은 기능을 포함한다.
각 Cluster에는 attribute, command, event 가 포함되어 있으며, 이는 필수적이거나 선택적 일수 있다.Matter Cluster의 주요 구성 요소.
- 속성(Attributes) : Cluster내에서 읽거나 쓸수 있는 변수를 나태남.
이는 장치의 상태, 설정, 또는 다른 정보를 표현하는데 사용. - 명령(Commands) : Cluster에서 특정 동작을 호출하는 기능을 제공.
명령은 연관된 매개변수를 가질 수 있다. - 이벤트(Events) : Cluster에서 발생하는 이벤트를 나타냄.
이벤트는 일반적으로 상태 변경 또는 기타 중요한 사항을 알리는데 사용.
- 속성(Attributes) : Cluster내에서 읽거나 쓸수 있는 변수를 나태남.


Note To learn more about clusters, See https://csa-iot.org/developer-resource/specifications-download-request/

-
Matter Commissioner
on-bording 프로세스 과정에서 Matter Device를 Matter Controller에 연결하는데 사용된다.
예를들어, SmartThings App이 설치된 모바일 장치가 이러한 연결을 수행하는 역할을 한다. -
Matter Controller
Matter Device 가 on-bording 된 후, 이를 제어하는 Hub 역할을 한다.
Thread 기반 장치를 연결하려면 Thread Boarder Router 가 포함된 Matter Controller가 필요하다. -
Matter Device
제어할 스마트 홈 장치이다. 장치에 Matter Badge가 있는 경우 서비스를 제공한다.
Matter 는 wifi, ethernet, thread와 같이 잘 알려진 ip 네트워크 위에 구축되는 애플리케이션 계층 프로토콜.
또한 저전력 bluetooth(ble)는 네트워크 형성 디바이스 식별 및 로직 구성과 관련된 프로세스인 무선 네트워크 커미셔닝에 사용됨.

Matter 애플리케이션 계층 프로토콜의 소프트웨어 인프라를 통해 사용자는 QR코드를 스캔하는 간단한 동작을 통해 새로운 Matter 기기를 연결할 수 있다.
Matter 기기의 QR코드에 내장된 몇 가지 주요정보를 통해 가능
- version
- vendor id
- product id
- custom flow
- discovery capabilities
- discriminator
- passcode
- padding
- tlv data
스캔하면 스마트폰의 ble기능이 활성화되어 matter기기를 매핑하고 식별할 수 있다.
그 후, QR코드에 포함된 정보를 기반으로 커미셔닝 시작.
commissioner과 Matter 기기간의 통신은 암호 인증 세션 프로토콜(PASE)을 통해 보호됨.
비밀번호는 QR코드에 내장된 비밀번호 기반 키 도출 함수(PBKDF)를 통해 생성.
설정된 비밀번호 키는 Matter 네트워크에서 두 기기 간에 교환되는 메시지의 암호화, 인증, 개인정보 보호에 차례로 사용됨.

이 시나리오에서 commissioner 역할을 하는 스마트폰은 수신 장치에 합법성과 신원을 확인하기 위해 장치 증명 자격증명(DAC)을 제공하도록 요청함.
허가를 받으면 commissioner는 나중에 인증 및 통신 목적으로 사용되는 노드 운영 자격증명(NOC) 을 기기에 생성하고 설치함.
BLE는 기본 통신 모드로 사용되지 않으며, 무선 네트워크에도 자격 증명을 제공해야 한다. (현재 wifi, thread가 지원)
이를 용이하게 하기 위해 commissioner는 기본적으로 네트워크의 모든 디바이스에 특정 작업을 수행 할 수 있는 권한을 부여하는 목록인 액세스 제어 목록에 관리자로 추가된다.
커미셔닝이 완료되면 새 장치가 네트워크(thread, wifi)에 추가되고 ble 세션이 닫힌다.
이전에 연결되었던 모든 matter 기기는 이제 새기기와 안전하게 통신할 수 있는 상태가 된다.
ref : https://github.com/project-chip/certification-tool
CSA(Connectivity Standards Alliance)는 1년에 2 차례 업데이트 발표.
CSA(Connectivity Standards Alliance)는 1년에 2 차례 업데이트를 발표하고 있으며,
Matter 1.0을 출시 한지 1년만인 2023년 10월 Matter 1.2 spec을 발표.
- 로봇 청소기, 냉장고, 세탁기, 식기세척기, 공기질센서, 공기청정기, 에어컨, 선풍기의 표준이 공개.
- 비교적 규모가 작은 도어락과 전구 카테고리에서 실질적인 수익을 창출하는 대형 가전제품으로 까지 Matter 확장.
2024년 5월에 공개. Matter 1.3 은 거의 모든 주요 가전제품과 함께 센서 및 EV충전기를 추가.
아직 카메라나 비디오 초인종 같은 기기들은 Matter에 포함되지 않음.
- 에너지 관리 지원 : 모든 매터 디바이스는 순간 전력, 전압, 전류 등의 실제 측정값과 예상 측정값을 실시간으로 보고
- 전기차 충전 지원
2024년 가을 예정된 다음 릴리즈에는 히트 펌프와 온수기가 추가될 예정. 태양열 패널 통합 등.
-
와이파이로 통신되는 제품들은 앱에서 바로 등록하기 때문에 허브가 필요 없음. 이 허브는 지그비 전파를 이용하여 작동되는 기기, 예를들어 전등스위치, 전동커텐레일 등 앱에 바로 등록 불가능한 기기를 스마트싱스앱에 등록시키는 역할.
-
지그비 전파로 통신되는 기기를 허브에 등록시키려면 삼성Idle 웹에 등록. (스마트싱스 정식 지원 기기들은 DTH가 필요 없이 인식되고 아닌 경우, DTH를 사용하여 인식)
- Zigbee 방식이 블루투스처럼 그냥 신호만 잡으면 바로 연결되는 것은 아니고, PnP처럼 스마트싱스가 정식 지원하는 센서가 아니면 Device Handler라고 하는 DTH(Device Type Handler)를 설치해야함.
-
스마트싱스 IDE사이트 세팅
-
IDE사이트 : https://account.smartthings.com

- Locations : 계정에 할당된 스마트싱스 플랫폼에 대한 장소.
- Hubs : 스마트싱스허브 장치에 대한 정보 제공.
- Devices : 스마트싱스 플랫폼에 연결된 모든 장치(센서, 가전 등) 정보 제공.
- Installed Apps : 쓰마트싱스 플랫폼 내에서 사용할수 있는 각종 앱 관리.
-
Github 연동
-
DTH를 등록하기 위해서는 크게 2가지의 방법이 있음.
= github 연동.
= 수동으로 사용자가 등록 -
https://github.com/SmartThingsCommunity/SmartThingsPublic 페이지에 접속하여 fork
-
IDE 사이트에서 연동.
-
-
-
결론 : 지그비를 사용하는 기기들을 묶어서 스마트싱스로 제어할 수 있게 하는 제품.


- Processor : i.MX8MMINI
- Wireless Connectivity
- K32W041AM-A : zigbee, thread, bluetooth le
- 88W8987 : wifi, bluetooth
- Feature :
- Target Matter Device Types :
- Gateways
- Hubs and Bridges
- Matter Controllers
- Thread Boarder Routers
- Media devices
- Smart Door Locks
- HVAC Controls
- Target Matter Device Types :
Commanx controller는 Commissioner 기능을 포함한 Controller.
Commissioner : Matter Device를 Matter Controller에 연결을 수행.
Android Platform 에 어플레킹션으로 구성.
-
Product Details : Certificate ID(CSA23066SWC60117-M3), Certified Date(12/19/2023), Vendor ID(0x1471), TIS/TRP Tested(No)
-
A.I voice recognition (Google)
-
link : https://www.commax.com/en/products/product/productView?seq=3106&nowPage=&prdcate=1
vs code를 통한 docker / remote container workflow
-
setup steps
- docker, vscode 설치.
- git clone main Matter repository
- dev Container extension for visual studio code 설치
-
bootstrapping source tree(one time)
- "Terminal" 메뉴에서, select "Run Task..."
- "Bootstrap" 선택
-
Building the Source Tree
- "Terminal" 메뉴에서, "Run Build Task..."
-
Tasks
- tasks json file 위치에서 "Run task..." 을 실행.
tasks json 을 추가 하여 개발 하도록 함.
- tasks json file 위치에서 "Run task..." 을 실행.
-
Current base tasks are listed here
- Main build : build the default configuation(i.e., Linux OpenSSL)
- Run Unit and Functional Tests : Test the default cofiguration
- Build & Test(all) : Build & Test various configurations (Linux variants, Android, EFR32)
- Update compliation database : Update the databse used by intelliSense
- Bootstrap : On a clean tree, pull in the third party dependencies required
3rd 에서 사용하는 library빌드 - Clean Output : Remove build artifacts
- Clean Tree : Full git clean of the tree
-
Launcher Tasks
- launch json file이 위치한 곳에서 해당 job에 대한 build & run 항목을 찾을 수 있음.

    [ homebridge ]


    [hub]   <---------------------->    [bridge]
    (e.g Apple homepod)                 (wallpad with matterbridge)
                                        (used HomeBridge?)
                                            |
                                            +-> (rs485)
                                            |      |
                                            |      +-> ks4506 protocol
                                            +-> ....
-Code lab : https://developer.samsung.com/codelab/smartthings/matter-virtual-device.html
- CHIPTool : Matter accessory devices 에 대한 commissioning, controlling 기능 어플리케이션.
다음 기능을 제공- Matter QR code 스캔 및 payload 정보 출력.
- Matter onboarding information이 포함된 NFC 태그 정보 읽기
- Matter 장치 commission
- Matter echo server 에 echo request 전송.
- Matter device에 Cluster on/off request 전송.
 - Building Android
   - Source files
   - Requirements for building
     - Linux
     - MacOS
     - ABIs and Target CPU
     - Gradle & JDK Version
   - Preparing for build
   - Building Android CHIPTool from scripts
   - Building Android CHIPTool from Android Studio
- Building Android CHIPTest from scripts-
Source files Android App에 대한 source files은 examples/android/ directory에 위치함.
-
Requirements for building Android SDK 26
NDK 23.2.8568313
$ANDROID_HOME 환경 변수.
$ANDROID_NDK_HMOE 환경 변수.
kotlinc 가 $PATH에 추가되어야 함.
export ANDROID_HOME=~/Android/Sdk
export ANDROID_NDK_HOME=~/Android/Sdk/ndk/23.2.8568313
export TARGET_CPU=arm64
export JAVA_HOME=$(dirname $(dirname $(readlink -f $(which java))))- building Android CHIPTool from scripts
sudo apt install openjdk-11-jdk./scripts/build/build_examples.py --target android-arm64-chip-tool build
# app-debug.apk will be generated at
# out/android-arm64-chip-tool/outputs/apk/debug/app-debug.apk- building Android CHIPTool from Android Studio
아래 명령어 입력을 통해 Android Studio 에서 Matter code 를 직접 빌드 할수 있게 함.
# 1. Matter top directory 에서 입력.
$ TARGET_CPU=arm64 ./scripts/examples/android_app_ide.sh

# 2. matterSdkSourceBuild variable 을 true로 변경.
# 3. matterBuildSrcDir 을 빌드 output directory.
# example/android/CHIPTool/gradle.properties

# 4. AndroidStudio에서 Project open 후, File -> Sync Project with Gradle Files. 선택.
# 5. Make Project 을 선택하여 빌드 또는 아래 명령어를 실행하여 빌드.
$ cd examples/android/CHIPTool
$ ./gradlew build

# 6. 아래 경로에 출력됨.
# examples/android/CHIPTool/app/build/outputs/apk/debug/app-debug.apk- building Android CHIPTest from scripts
Device commissioning 과 controlling Android application
아래 기능을 제공함.
- Scan QR code 및 payload 정보 출력.
- NFC Tag 정보 읽기.
- Commission CHIP device.
- CHIP echo server 에게 echo request 전송.
- CHIP device 에게 on/off cluster requests 전송.
SDK 는 SDK 및 Matter 분석에 필요한 다양한 Device 및 Controllers Sample 코드를 제공.
example devices (App) 은 examples directory 에 위치.
example에서는 특정 장치 Type을 구현하는 경우가 많이 있으며, 일부는 다양한 플랫폼에 대해 구현했다.
all-clusters-app 은 사용가능한 모든 Cluster를 구현했으며, 특정 장치 유형을 따르지 않는다.
this app is not a good starting place for product development.
Device 와 interact하는데 사용가능한 2 개의 example controller 가 있음.
-
chip-tools interactive shell 을 가지고 있는 C++ command line controller 이다.
-
chip-repl python controller 용 shell 이며,
chip-repl 은 test 에 사용되는 python controller framework의 일부
example directory 는 example device composition .zip 파일을 사용하는 app의 set가 포함되어있다.
-
lighting app 빌드
build system은 Ninja / GN 을 사용.
build 를 위한 script가 제공(scripts/build/build_examples.py).
# build with the script
# scripts/build/build_examples.py targets
# scripts/build/build_examples.py --target <your target> build

#  builds to
# out/<target_name>/
-
lighting app 과 chip tool 빌드
-
. scripts/bootstrap.sh - run this first, or if build fail
-
. scripts/activate.sh - faster, bootstrap 생성된 경우, 터미널에서 실행
-
Lighting app(device side)
-
./scripts/build/build_example.py --target linux-x64-light-no-ble build

# output
./out/linux-x64-light-no-ble/chip-lighting-app- chip-tool(controller side)
./scripts/build/build_example.py --target linux-x64-chip-tool build

# output
./out/linux-x64-chip-tool/chip-tool
- device를 commission 상태 시작.
./out/linux-x64-light-no-ble/chip-lighting-app - default로 default discriminator(3840) / passcode(20202021) 로 시작됨.
정보를 /temp/chip_kvs에 저장(--help command 참고)
실행 시, setup information을 출력함
./out/linux-x64-linux-no-ble/chip-lighting-app
[1716967542.624757][545111:545111] CHIP:IN: TransportMgr initialized
[1716967542.624761][545111:545111] CHIP:ZCL: Emitting StartUp event
[1716967542.624776][545111:545111] CHIP:EVL: LogEvent event number: 0x0000000000000001 priority: 2, endpoint id:  0x0 cluster id: 0x0000_0028 event id: 0x0 Epoch timestamp: 0x0000018FC33D8F60
[1716967542.624781][545111:545111] CHIP:SVR: Server initialization complete
[1716967542.624787][545111:545111] CHIP:SVR: Server Listening...
[1716967542.624790][545111:545111] CHIP:DL: Device Configuration:
[1716967542.624797][545111:545111] CHIP:DL:   Serial Number: TEST_SN
[1716967542.624804][545111:545111] CHIP:DL:   Vendor Id: 65521 (0xFFF1)
[1716967542.624810][545111:545111] CHIP:DL:   Product Id: 32769 (0x8001)
[1716967542.624813][545111:545111] CHIP:DL:   Product Name: TEST_PRODUCT
[1716967542.624819][545111:545111] CHIP:DL:   Hardware Version: 0
[1716967542.624822][545111:545111] CHIP:DL:   Setup Pin Code (0 for UNKNOWN/ERROR): 20202021
[1716967542.624826][545111:545111] CHIP:DL:   Setup Discriminator (0xFFFF for UNKNOWN/ERROR): 3840 (0xF00)
[1716967542.624831][545111:545111] CHIP:DL:   Manufacturing Date: (not set)
[1716967542.624834][545111:545111] CHIP:DL:   Device Type: 257 (0x101)
[1716967542.624841][545111:545111] CHIP:SVR: SetupQRCode: [MT:-24J0AFN00KA0648G00]
[1716967542.624846][545111:545111] CHIP:SVR: Copy/paste the below URL in a browser to see the QR Code:
[1716967542.624849][545111:545111] CHIP:SVR: https://project-chip.github.io/connectedhomeip/qrcode.html?data=MT%3A-24J0AFN00KA0648G00
[1716967542.624854][545111:545111] CHIP:SVR: Manual pairing code: [34970112332]
[1716967542.629356][545111:545111] CHIP:DIS: Updating services using commissioning mode 1- 새로운 터미널을 통해 chip-tool 을 실행.
아래 정보를 입력하여 device 에 commission 한다.
./out/linux-x64-chip-tool/chip-tool pairing code 34970112332 MT:-24J0AFN00KA0648G00- Basic device interactions - command 전송
# onoff : Cluster name
# on or off : Command name
# 34970112332 : node ID (commissioning 에 사용되는)
# 1 : endpoint
./out/linux-x64-chip-tool/chip-tool onoff off  34970112332   1
(...)
[1716969478.975661][671474:671477] CHIP:DMG: InvokeResponseMessage =
[1716969478.975666][671474:671477] CHIP:DMG: {
[1716969478.975672][671474:671477] CHIP:DMG:    suppressResponse = false,
[1716969478.975692][671474:671477] CHIP:DMG:    InvokeResponseIBs =
[1716969478.975700][671474:671477] CHIP:DMG:    [
[1716969478.975705][671474:671477] CHIP:DMG:            InvokeResponseIB =
[1716969478.975713][671474:671477] CHIP:DMG:            {
[1716969478.975718][671474:671477] CHIP:DMG:                    CommandStatusIB =
[1716969478.975725][671474:671477] CHIP:DMG:                    {
[1716969478.975730][671474:671477] CHIP:DMG:                            CommandPathIB =
[1716969478.975737][671474:671477] CHIP:DMG:                            {
[1716969478.975743][671474:671477] CHIP:DMG:                                    EndpointId = 0x1,
[1716969478.975750][671474:671477] CHIP:DMG:                                    ClusterId = 0x6,
[1716969478.975755][671474:671477] CHIP:DMG:                                    CommandId = 0x0,
[1716969478.975761][671474:671477] CHIP:DMG:                            },
[1716969478.975769][671474:671477] CHIP:DMG:
[1716969478.975775][671474:671477] CHIP:DMG:                            StatusIB =
[1716969478.975782][671474:671477] CHIP:DMG:                            {
[1716969478.975788][671474:671477] CHIP:DMG:                                    status = 0x00 (SUCCESS),
[1716969478.975793][671474:671477] CHIP:DMG:                            },
[1716969478.975800][671474:671477] CHIP:DMG:
[1716969478.975805][671474:671477] CHIP:DMG:                    },
[1716969478.975813][671474:671477] CHIP:DMG:
[1716969478.975818][671474:671477] CHIP:DMG:            },
[1716969478.975825][671474:671477] CHIP:DMG:
[1716969478.975830][671474:671477] CHIP:DMG:    ],
[1716969478.975838][671474:671477] CHIP:DMG:
[1716969478.975843][671474:671477] CHIP:DMG:    InteractionModelRevision = 11
[1716969478.975847][671474:671477] CHIP:DMG: },
- Basic device interactions - attribute 얻기
# onoff : Cluster name
# read : action 에 대한 설명
# on or off : Attribute name
# 34970112332 : node ID (commissioning 에 사용되는)
# 1 : endpoint

./out/linux-x64-chip-tool/chip-tool onoff read on-off 34970112332 1
(...)
[1716969376.970379][662009:662011] CHIP:DMG: ReportDataMessage =
[1716969376.970387][662009:662011] CHIP:DMG: {
[1716969376.970392][662009:662011] CHIP:DMG:    AttributeReportIBs =
[1716969376.970400][662009:662011] CHIP:DMG:    [
[1716969376.970405][662009:662011] CHIP:DMG:            AttributeReportIB =
[1716969376.970412][662009:662011] CHIP:DMG:            {
[1716969376.970417][662009:662011] CHIP:DMG:                    AttributeDataIB =
[1716969376.970423][662009:662011] CHIP:DMG:                    {
[1716969376.970430][662009:662011] CHIP:DMG:                            DataVersion = 0x803589e5,
[1716969376.970436][662009:662011] CHIP:DMG:                            AttributePathIB =
[1716969376.970444][662009:662011] CHIP:DMG:                            {
[1716969376.970451][662009:662011] CHIP:DMG:                                    Endpoint = 0x1,
[1716969376.970459][662009:662011] CHIP:DMG:                                    Cluster = 0x6,
[1716969376.970466][662009:662011] CHIP:DMG:                                    Attribute = 0x0000_0000,
[1716969376.970473][662009:662011] CHIP:DMG:                            }
[1716969376.970481][662009:662011] CHIP:DMG:
[1716969376.970489][662009:662011] CHIP:DMG:                            Data = true,  <<<<<<<<<<<<<<<< data
[1716969376.970495][662009:662011] CHIP:DMG:                    },
[1716969376.970504][662009:662011] CHIP:DMG:
[1716969376.970509][662009:662011] CHIP:DMG:            },
[1716969376.970518][662009:662011] CHIP:DMG:
[1716969376.970523][662009:662011] CHIP:DMG:    ],
[1716969376.970532][662009:662011] CHIP:DMG:
[1716969376.970538][662009:662011] CHIP:DMG:    SuppressResponse = true,
[1716969376.970545][662009:662011] CHIP:DMG:    InteractionModelRevision = 11
[1716969376.970550][662009:662011] CHIP:DMG: }open source 중 검토해야 할 tech 를 확인.
- Wi-Fi Nodes : chip-tool
- Controllers : chip-tool, IP Pairing, Automated CASE tests
+--------------------------+
|                          |
| Cluster Implementations  |
|                          |
+--------------------------+
| Ember (generated)        |
+--------------------------+
|                          |
| Core                     |
|                          |
|                          |
+--------------------------+
| Platform API             |
+--------------------------+
| Platform Implementations |
+--------------------------+-
Platform Layer Platform layer는 network stack 과 base OS 간 연결을 구현.
Messages는 유선을 통해 Platform Layer 로 전달되고,
그곳에서 Matter stack 의 처리를 위해 Platform API로 라우팅 된다. -
Platform API Platform API는 core 와 상호작용하는 common layer를 정의.
-
Core Core 는 모든 기본 통신 프로토콜을 포함하여, spec 의 큰 부분을 포함.
핵심 코드는 Cluster 요청 및 관련 endpoint 정보를 나타내는 유효한 Message를 ember layer에 전달하는 것. -
Ember Ebmer layer는 하나의 디바이스의 SPIECIFIC을 구성을 구현하는 담당하는 Generated된 layer.
각 message 를 확인하고, device가 선택한 endpoint cluster에서 selected 된 attribute 또는 command를 구현했는지 확인한 다음, implementation과 access control에 따라 message를 block하거나 route 한다.
유효한 request은 처리를 위해 Cluster implementations으로 전달되고 잘못된 request은 error와 함께 다시 전송된다.
Ember layer는 디바이스를 나의 디바이스로 만드는 부분이며, 대부분은 ZAP을 사용하여 정적으로 생성된다.
- Cluster implementations
Cluster implementations은 Cluster 의 back logic이다.
Cluster implementations은 ember layer로 부터 message를 수신하여, Cluster에 Data Model Operations(read/write/command invokes)을 요청한다.
또한 event generation 및 attribute change reporting 을 담당한다.
기능이 간단한 Cluster Logic은 Ember Callback function에 작성될 수 있지만, 복잡한 Cluster Logic은 Runtime에 설치된 Interface Layer 에 의해 처리 된다.
- docs
- docs/guides/BUILDING.md - follow this first
- docs/guides/chip_tool_guide.md
- examples
- examples/chip-tool - main controller example
- examples/all-alusters-app - QA app
- examples/ - Specific Device examples
- scripts
- bootstrap.sh & activate.sh - environment setup
- build/build_examples.py - build example code
- tools/zap/run_zaptool.sh - start zap tool
- tools/zap_regen_all.py - .zap -> .matter
- src
- controller - client side code including python implementation
- app - base server side code
- app/clusters - cluster implementations. (.cpp)
- app/zap-templates/zcl/data-model/chip/ - cluster definitions (.xml)
- app/tests/suites/cetification - yaml cert test automation scripts
- lib/support - Embedded versions of common utilities
- platform - platform delegate APIs / implementations
- include/platform - platform delegate APIs / implementations
- python_testing - python cert test automation scripts
- zzz_generated/app-common/app-common/zap-generated/*
- 생성된 cluster logic / namespaces
- data_model
- 파일이 생성되어 spec에 대한 적합성을 확인하는데 사용. (직접 수정 하면 안됨)
GN 은 메타 빌드 시스템.
Ninja 빌드 파일을 생성하여 Ninja 를사용하여 프로젝트를 빌드할 수 있도록 한다.
GN은 원래 Chromium 소스 트리의 일부였으며, 현재는 독립적인 GN 저장소로 분리됨.
ZAP (ZCL Advanced Platform)은 Matter Cluster 를 기반으로 한 notde.js 템플릿 엔진.
ZAP 은 Matter 앱 및 SDK 에 다음과 같은 기능을 제공.
- Matter 엔드포인트 구성:
- Matter 장치와 상호 작용하는데 필요한 Cluster, Attribute, Etc entity 를 구성.
Android 15 could support direct connection to Matter smart home devices
- Thread mesh networking protocol이 Android 15 에 통합 됨.
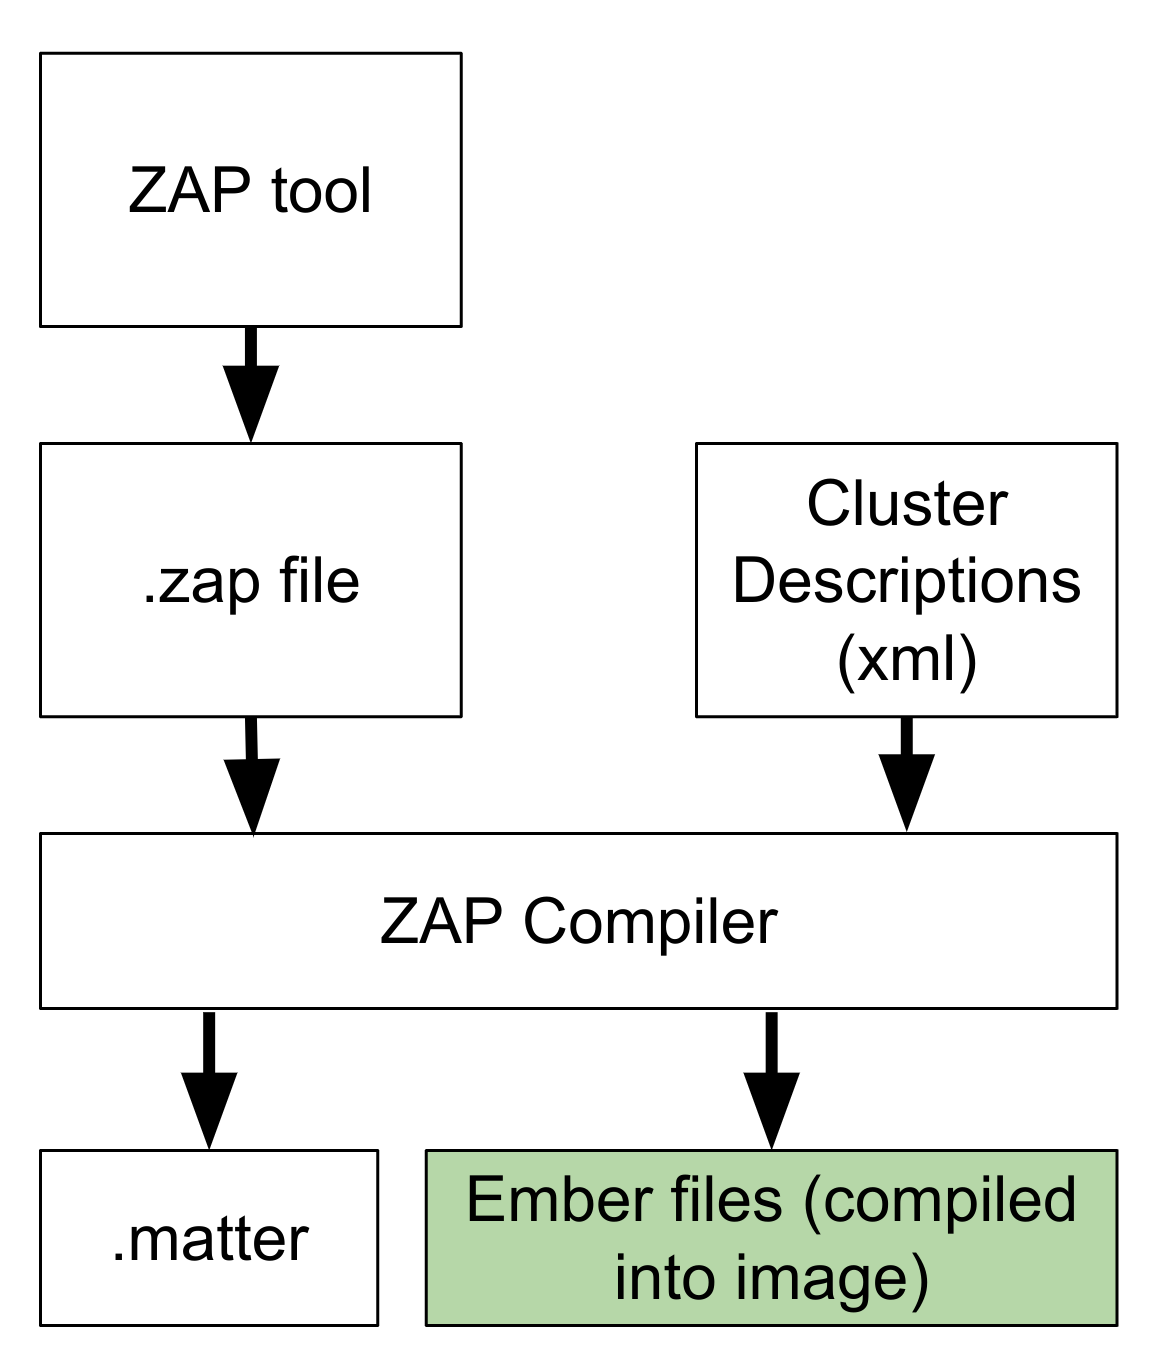
ZAP tool 은 device의 endpoint composition을 설명하는 .zap 파일을 생성하는 데 사용되는 GUI tool.
device endpoint의 Cluster, Device types, Cluster features, attributes, commands, event 가 포함됨.
.zap 파일은 Cluster definitions files과 함께 ZAP Compiler에서 ember layer를 생성하는데 사용됨.
이는 build process의 일부로 자동으로 동작.
.matter 파일은 .zap파일을 검토 할 수있도록 변환된 버전.
./scripts/tools/zap/run_zaptool.sh 을 사용하여 실행.
./scripts/tools/zap/run_zaptool.sh examples/all-clusters-app/all-clusters-common/all-clusters-app.zapTO-DO : Cluster setup, Attribute Reporting 등 확인 해야함. ZAP Link
DNS-SD(DNS Service Discovery) 기술은 local network에서 서비스를 찾기 위한 기술.
주로 IoT 및 다양한 네트워크 기기에서 사용.
이 기술은 DNS(Domain Name System)을 활용하여 서비스를 검색하고 발견하는 방법을 제공.
Device discovery 은 DNS-SD 기술을 통해 이뤄진다.
DNS-SD 기술은 Wi-Fi는 mDNS 를 통해 처리되고, thread 는 Boarder router의 SRP 서버를 사용.
Host PC에서 mDNS 애플리케이션을 사용하여, Device 를 검색할수 있다.
Linux 용 mDNS Program은 Avahi.
// remove the lock file in the gralde chache by executing something like this.
find ~/.gradle -type f -name "*.lock" -delete