See also:
http://mrfmap.github.io, the project page for MRFMap: Online Probabilistic 3D Mapping using Forward Ray Sensor Models.
mrfmap, the MRFMap library, that this package is a ROS wrapper for.
Originally developed by Kumar Shaurya Shankar while working in the RISLab at The Robotics Institute at Carnegie Mellon University with Prof. Nathan Michael.
This is research software - although efforts are made for it to be reliable, it is untested and unsuitable for critical operations.
mrfmap_ros is released under the permissive BSD-3 license.
Please feel free to issue pull requests and bugs.
If you end up using this library, please cite
@inproceedings{shankar20mrfmap,
  author = {Shankar, Kumar Shaurya and Michael, Nathan},
  title = {{MRFMap: Online Probabilistic 3D Mapping using Forward Ray Sensor Models}},
  booktitle = {Robotics: Science and Systems},
  year = 2020
}
This package provides simple ROS wrapper interfaces as well as scripts used to generate results for the aforementioned paper.
- An NVidia GPU with compute capability >5.3 (which means >Pascal series(GTX 1060+)) since we use half2 intrinsics
- CUDA version >10
- A linux machine (Although Windows builds are not too hard to accomplish - Please contact the maintainer/send a pull request if you are interested in the same!)
- CMake >3.13
- ROS
Tested known-good build configurations:
- Ubuntu 16.04 + CUDA 10.1 on GeForce GTX 1070
- Ubuntu 18.04 + CUDA 10.1 on GeForce GTX 2060 Super
- Ubuntu 18.04 + CUDA 10.2 on NVIDIA Xavier NX
Other configurations (such as newer versions of CUDA/different Linux flavours) should work as well, however they haven't been tested.
Please see the MRFMap library README for building the library.
The python scripts in this package require a few third party dependencies, available from pip. It is highly recommended to create a virtualenv and installing the libraries within.
sudo apt install python-virtualenv
virtualenv ~/virtualenv
source ~/virtualenv/bin/activate
We need the following python libraries
- MayaVi - a VTK based 3D visualisation library
- matplotlib - the generic python plotting library
- numpy - general purpose matrix ops
- scipy - samlping ops
- PyGeometry - for SE3 group and algebra operations
- catkin_tools - for using catkin verbs
- PyYAML - for parsing YAML files
- Click - for nice progress bars
- opencv-python - for image manipulation
pip install -U vtk PyYAML mayavi matplotlib numpy scipy PyGeometry==1.5.6 opencv-python click
Create a new overlay
 cd ~ && mkdir -p sandbox/mrfmap_sandbox/src && cd sandbox/mrfmap_sandbox && catkin init
 catkin config -DCMAKE_BUILD_TYPE=Release
 catkin config --install
 cd src && git clone https://github.com/mrfmap/mrfmap_ros.git
 catkin build mrfmap_ros
We provide a runtime executable, ros_mrfmap_node, that runs the inference in real-time and can visualise the map and the keyframe poses as well. Configuration data is provided by the means of config files, such as this one instead of providing via ROS params. To start off with your own live stream or bag file, create a copy of an existing dataset config file, and specify the following parameters
Within viewer_params_nodes,
- Raw depth image ROS topic under
camera_topic - PoseStamped or Odometry ROS topic of the body frame under
odom_topic. In case of the latter, setis_legacy_odom: True - A transformation that takes points from the camera frame to the body frame under
cam_to_body - An image scale factor for the depth images to convert the values to meters under
img_scale_factor. This is usually 0.001 for Primesense style camera streams that encode the depth as U16 ints - The average temporal lag between the camera stream and the pose stream for detecting the same real-world event, under
img_lag. This can be determined, e.g. using a simple script like this one. - If you want to activate and visualise the Octomap wrappers on the same data, set
view_octomap: True - Finally, to specify the geometric displacement thresholds for adding a new keyframe specify the values to
rotation_threshandtranslation_thresh. These are the either of the thresholds that an incoming pose would have to cross in terms of distance from all previously added keyframes.
Within gvdb_params,
K: The camera intrinsics matrixres: The resolution of the smallest voxel in the mapdims: The maximum possible extents of the map. The map will be centered about the x and y dimension sizes.rowsandcols: The number of rows and columns respectively of the depth image.const_sigmasq_poly: The noise model to use for all pixels. In practice this parameter will determine the quality of the MRFMap. In general make sure that the value of the noise is of the order of a standard deviation of a voxel size. The coefficients correspond to increasing polynomial degree.
Finally, specify your config file to ros_mrfmap_node, and run!
rosrun mrfmap_ros ros_mrfmap_node _config_file:=/path/to/your/config.yaml
Note that it is advisable to not render the map while it is being built for very fine resolutions, especially if the OctoMap thread is also running.
Download the datasets available at this link into a folder. For instance, for the augmented ICL livingroom1 dataset
mkdir -p ~/bagfiles/ICL && cd ~/bagfiles/ICL
wget https://cmu.box.com/shared/static/6pxta6wam1zb0jw1f38uj9vgzt5zbccb.bag -O living_room_with_rgb_noise.bag
(Alternatively, it is possible to utilise/modify the nodes/dataset_creation/pngs_to_bags.py script to take a PNG file dataset and store it as a ROS bag)
To perform a batch generation of the map with a particular config, run the nodes/dataset_evaluation/rss_dataset_eval.py script from the script directory. Set the desired dataset ID in the script and run it!
cd nodes/dataset_evaluation && ./rss_dataset_eval.py
This should parse the corresponding config file, load the bag file, and generate and save the maps to disk in a generated folder inside your dataset directory. It will then visualise the map, and then proceed into the accuracy evaluation section, at which it will pop up an interactive GUI to analyse the accuracy at each data index.
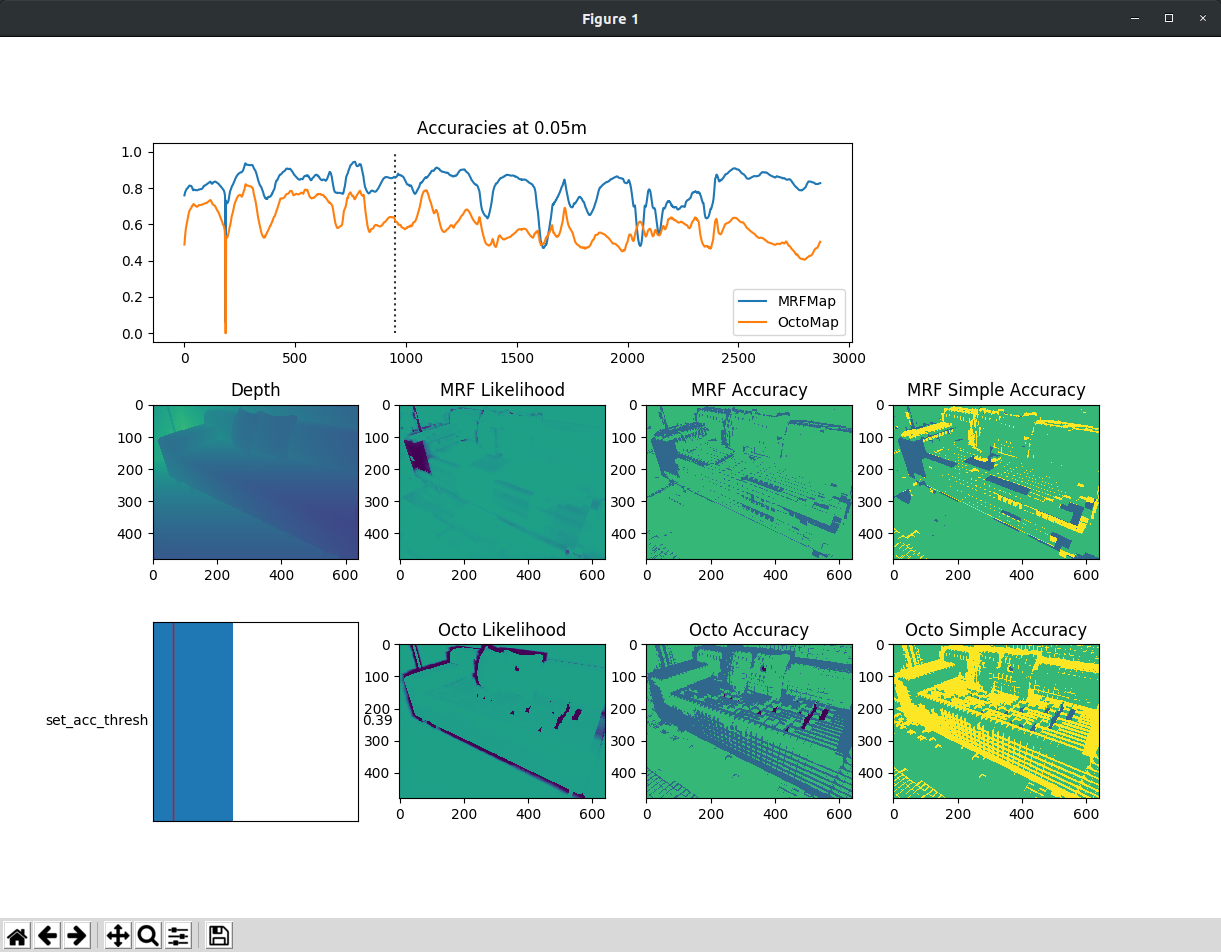
After running it at the different map resolution configurations, you can choose to plot the accuracies and the timings using the corresponding scripts in the same folder.
The sensor data noise collecting utility is present in nodes/dataset_creation/depth_collector.py. Included in the bags folder is a sample dataset file collected with the realsense that can be downloaded in the same directory for visualisation. Note that due to exigent circumstances the dataset could not be recollected, and so the utility has not been rigorously tested. nodes/dataset_creation/coffin_world_generator.py generates the depth and pose images used for creating the coffin world dataset within gazebo.